No soldering required to mod your handheld CB radio into Export Mode, or changing into any provided band. Press and hold PTT + FUNC (on PNI, or upper left button of any other brand), turn on device and select between the tables:
Table 1 “Multinorm” EU 40CH FM/AM 26.96500 – 27.40500 CE 40CH FM 26.96500 – 27.40500 UK 40CH FM 27.60125 – 27.99125 PL .. I2 .. DE 80CH FM 26.56500 – 27.40500 / 40 CH AM 26.96500 – 27.40500 IN ..
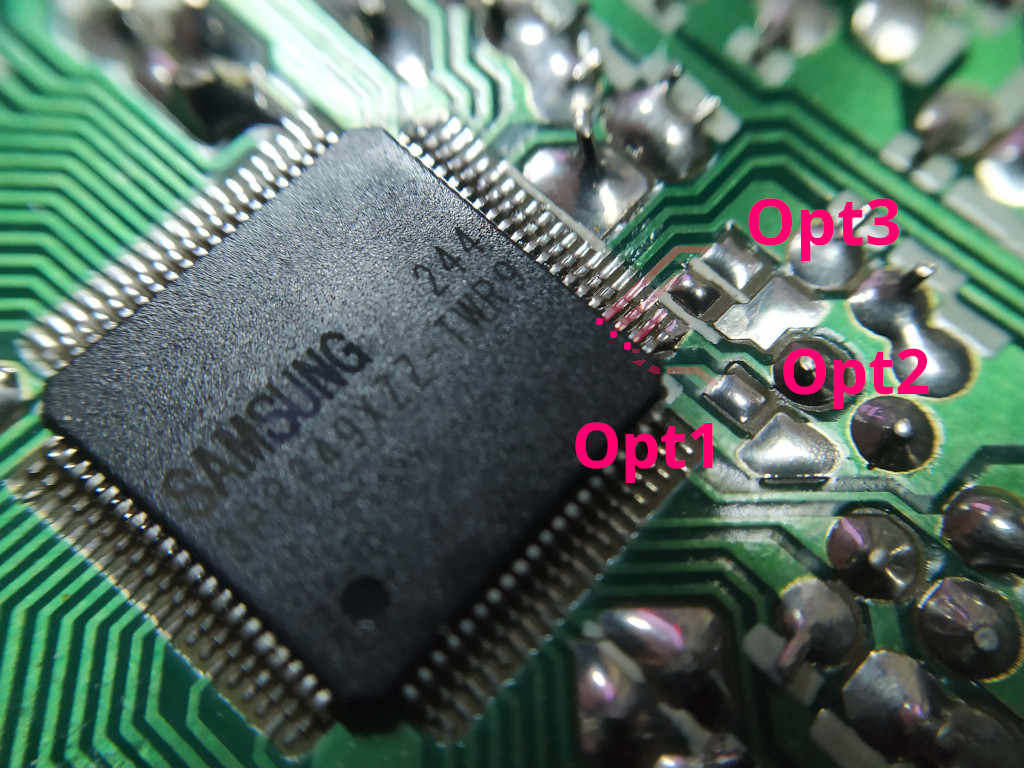
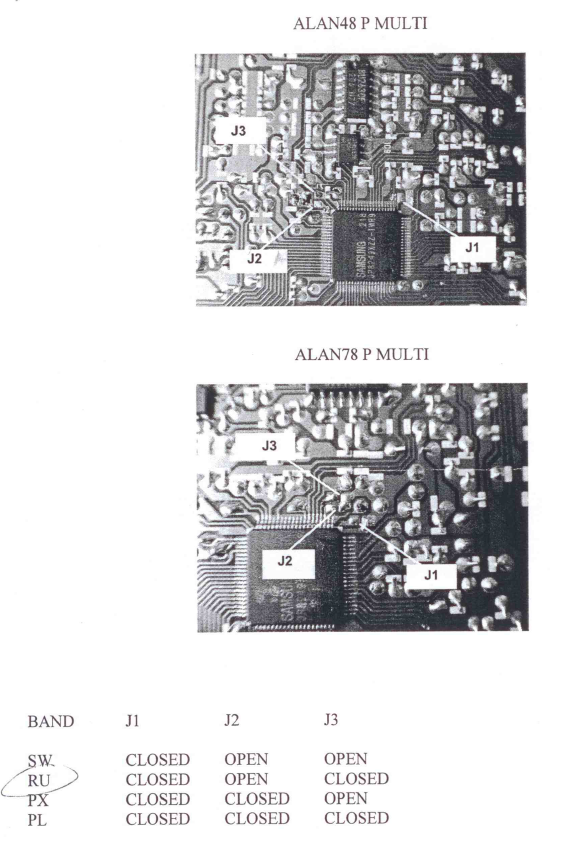
Although in another post listed as Opt1..3, from one it seems where the PCB is printed with the info is as shown in this picture. It doesn’t really matter though, as bridges Opt1 & Opt3 need to be closed, for our case.All 3 Opt bridges closed, it seems this works as well. https://obrazki.elektroda.pl/92_1221586315.jpgInverted bridge numbering, original picture from https://www.elektroda.pl/rtvforum/topic1099281.html#galleryFrom document JUMPER J1J2J3 48_78 MULTI.doc
Getting me a new (used) K-7 got me also excited. That excitement unfortunately vanished with the search for the Pentax specific software for browsing and altering PEF format. The software were found on Ricoh’s website, but unfortunately it didn’t install. Why? Pentax closed out all users who do not own the original CD with the original camera software. **great:sarcastic**
Luckily some other people also faced the same issue and were able to resolve it. Just stub something that mimics the CD’s naming, and you’re able to install the software (called “… Update”) no issues:
So you have purchased a new-to-you Pentax DSLR and would like to have the Pentax software installed. Problem is that you don’t have the CD that came with the camera. You can go to the Pentax site and download the software but it’s called an update and won’t install without the original software or CD… Well, seems that you don’t need the original CD or the software installed on your computer to be able to install the software.
1) Download the software here, you can download the version 4 or 5 (your preference), the 64bit version 5 would be the better software if your computer can handle it: Software Downloads : Support & Service | RICOH IMAGING 2) Get a SD card or USB drive and insert into the computer. 3) Rename the card or drive S-SW90 for use with version 4 4) Rename the card or drive S-SW140 for use with version 5
Nothing has to be on the card or drive, they just have to be renamed. Run the updater software that you downloaded above and just choose the defaults as it installs.
import bpy
from mathutils import Color

threshold = .1
obj = bpy.context.object

bpy.ops.object.mode_set(mode="OBJECT")

colors = obj.data.vertex_colors.active.data
selected_polygons = list(filter(lambda p: p.select, obj.data.polygons))

if len(selected_polygons):
    p = selected_polygons[0]
    r = g = b = 0
    for i in p.loop_indices:
        c = colors[i].color
        r += c[0]
        g += c[1]
        b += c[2]
    r /= p.loop_total
    g /= p.loop_total
    b /= p.loop_total
    target = Color((r, g, b))

    for p in obj.data.polygons:
        r = g = b = 0
        for i in p.loop_indices:
            c = colors[i].color
            r += c[0]
            g += c[1]
            b += c[2]
        r /= p.loop_total
        g /= p.loop_total
        b /= p.loop_total
        source = Color((r, g, b))

        print(target, source)

        if (abs(source.r - target.r) < threshold and
            abs(source.g - target.g) < threshold and
            abs(source.b - target.b) < threshold):

            p.select = True

bpy.ops.object.editmode_toggle()
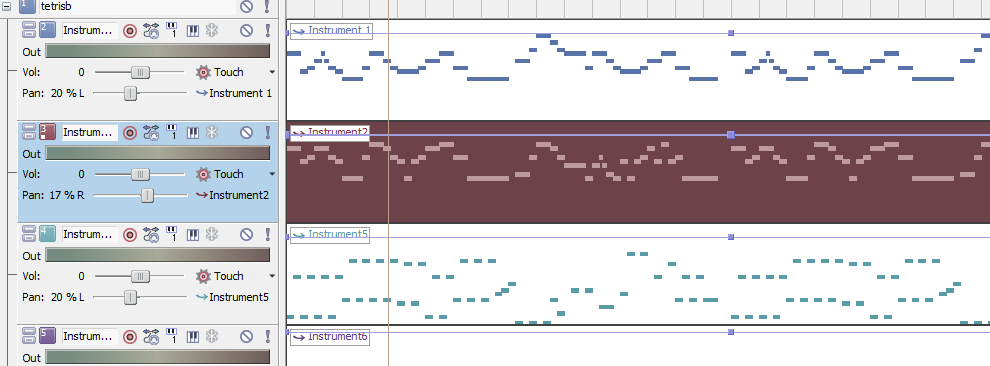
This solution might work for all versions of ACID, as I assume they kept the caching method throughout its lifetime. Even the Sony to Magix transition you can neglect with minor path adaptation.
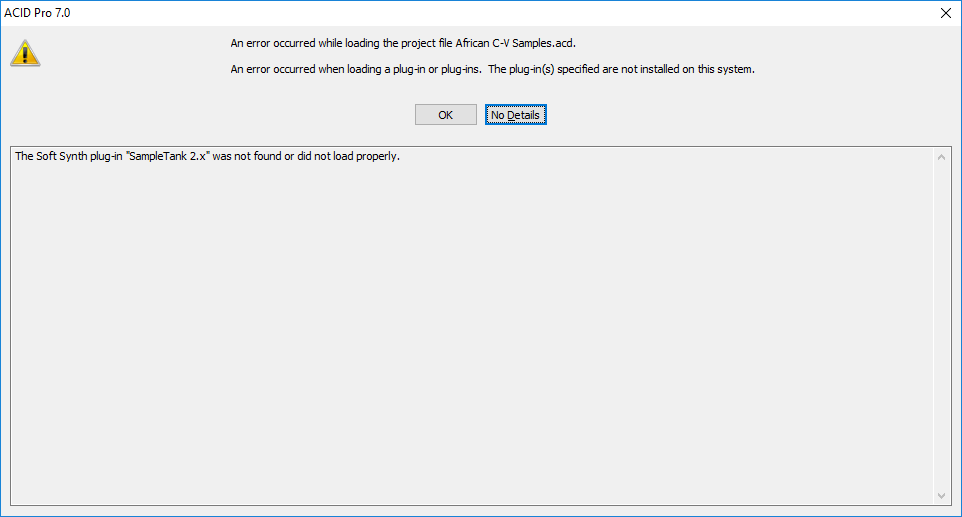
Not an unusual view in Sony’s / MAGIX’ ACID Pro
What happened
My Windows 7 based DAW shot itself by updating. Uncertain about the real cause, thus definitely certain about the Windows 7 repair start up tool not finding any operating systems on the plate from where Windows 7 tries to diagnose itself … stop right there!
Granted, my SSD might ‘ve died. Pretty sure after running it on flashing SMART events since over a year already. It had to die. Casualties happen, and what else could ‘ve happened except for finally giving up … rrright, the Windows 7 update . . . wouldn’t be the first time to witness Windows shooting itself for good. But I thought that those times were over. “Just slide in the Windows 7 DVD and let it heal itself” some might argue. But I hold up by, what DVD drive would ever consume my non-existent Win7 Pro Installation Media?
Wait, what was I writing about again? Ah yes. Obviously I was way out of date with my Windows 7 steam machine .. “old” they called me. So it was finally time to make the big step for human kind hop onto the hip train of Windows 10!
Easy peasy, install Windows 10, install drivers, install ACID Pro 7.0e! Next thing , throwing all the VST Plugins at it with excitement to kick of my fresh DAW by pushing some tunes through my “Microsoft Sound Mapper”, it complains about certain VST plugins not being loaded or installed properly.
The obvious issue
The Soft Synth plug-in “SampleTank 2.x” was not found or did not load properly.
Shhh …. what? I did just install that. I just played on my MIDI piano some sick tunes to test its finest quality (and functioning). Why on earth doesn’t it work … ? Quick test, creating a new project, Insert Soft Synth, MIDI track, click-click, there’s music. SampleTank works … o.O What is happening? Opening the other project files … still complaining about the VST plugin missing. “Hmm …” (I made)
To me this looked like a simple issue being hidden in the depths of configs or registry entries being fudged up between Win7 : Win10. So onto my stupid idea to fix my old files, or they are all gone for good .. so onto my crusade! :D (don’t forget to smile, always smile)
Trial and Error made me conclude to this ..
Solution
There is basically two solutions to be able to load the “missing” plugins again, and that ‘d be
Fixing plugin’s GUIDs in ACD file
Fixing plugin’s GUIDs in acidpro.plugincache.xml file
For both of those solution you’ll need at least two files: your Acid project file and the plugin cache file! Because now, we need to match plugin GUIDs between those two files!
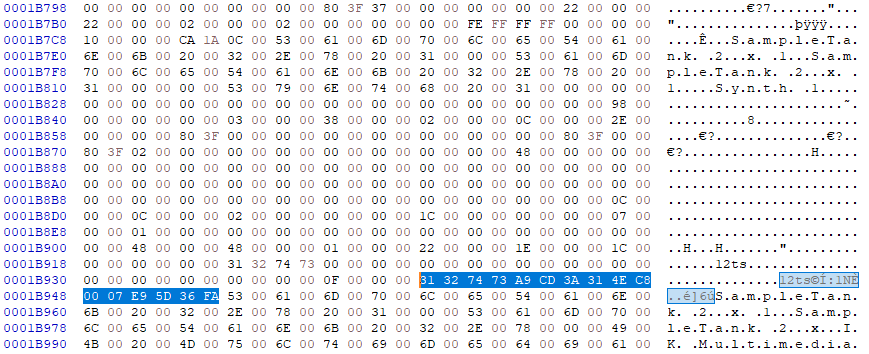
Acid (*.acd) Project files are binary (not readable as text as is), you’ll need to install some Hex Editor. With its Search functionality you need to walk through the file until you find the Hex value of its desired String, and jump to its “inner” occurrence where you also read its Vendor name right after it:
In front of each plugin name, you’ll find its GUID. When you see the vendor’s name after the plugin name, that is the correct spot to dig for the GUID. The first 2 occurrences you see above are Acid’s internal mapping, you won’t find the GUID there!Having the correct spot, you’ll notice a Hex value after some silenceLooking at the Data Inspector, we read GUID .. yes that is the GUID that Acid tries to find for loading plugins.
So now, you’ve found the GUID that the Acid tries to load as plugin when opening this ACD project file.
ACID keeps its plugins information in a Xml Cache file called. Simply search your User folder for “acidpro.plugincache.xml”, or find it on your computer by this path for MAGIX Acid Pro 7:
In there you will find the currently installed plugin’s GUID, just search for the plugin’s name, e.g. “SampleTank”.
Example of acidpro.plugincache.xlm file containing SampleTank’s GUID
and you’ll find its GUID easily. This GUID is almost a 1:1 representation of the GUID being used within the ACD project files! Looking into the ACD file in the Hex Editor, it matches the ‘decrypted’ data in the GUID tab:
The selected area, the GUID in the Data Inspector of the Hex Editor. This GUID needs to match the GUID in the Xml file! It does here, since I’ve fixed it already.
It is now up to you, which way you fix this. Either by altering the GUIDs of your ACD project files, or by altering the GUID in the plugincache, so you have only to change it there once, instead of changing all ACD project files …
Recently I had to fix per-face-vertex normals for a project and I had to come up with a script snippet to ease the manual touches involved in the task.
Run this script on any selected object in Object Mode.
import bpy
print("Flattening per face normals ..")
current_obj = bpy.context.active_object
# Calc
current_obj.data.calc_normals_split()
# Vertex-per-face Normals
n = []
for face in current_obj.data.loops:
    n.append(face.normal.copy())
    n[face.index][1] = 0
    n[face.index] = n[face.index].normalized()
    print("i", face.index , "n", face.normal, "n2", n[face.index])

current_obj.data.normals_split_custom_set(n)
current_obj.data.update()
current_obj.data.free_normals_split()
print("Done.")
After execution you may change into Edit Mode and see the normals flattened.